Step 1: From the main calendar form, select "File" from the menu bar, then select "Setup". This will take you to the "Setup Options Form". Enter your company information and various program settings here.

| Quick Start Tutorial |
1. Setup Your Company Information
Step 1: From the main calendar form, select "File" from the menu bar, then select "Setup". This will take you to the "Setup Options Form". Enter your company information and various program settings here.
2. Adding New Employees
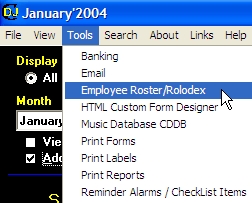
Step 1: From the main calendar form, select "Tools" from the menu bar, then select "Employee Roster/Rolodex". This will take you to the "Employee Form". Add your employee information here.
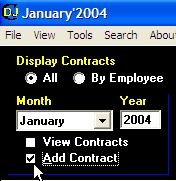
3. Adding Your First Contract
Step 1: From the main calendar form, select the checkbox labeled "Add", then click your mouse on any calendar date box. This will take you to the "Contract Form". Enter your Event Information here.
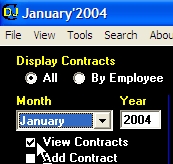
4. Edit or View Existing Contracts
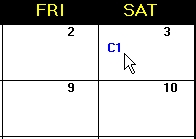
Step 1: From the main calendar form, select the checkbox labeled "View", then click your mouse on any calendar date box with exiting contracts. In the previous example, we added a contract for January 3rd. After we saved this contract, a status code automatically appears in the same calendar date box. This features allows you quickly view how many contracts you have scheduled for a particular day. You can setup your own contract status codes from the "Setup Options Form".
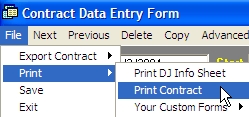
5. Printing Your First Contract
Step 1: Follow the instruction above to open or view an existing contract.
Step 2: From the contract form, select "File" from the menu bar, then select "Print", then select "Print Contract". You can setup your own contracts or other custom form templates on the "Setup Options Form".
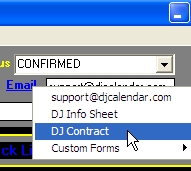
6. Emailing Your First Contract
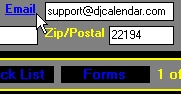
Step 1: Follow the instruction above to open or view an existing contract.
Step 2: From the contract form, click on the blue label entitled "Email" (make sure there is an email address in the text box). Once you click on the blue label "Email", select "DJ Contract". This will take you to the email form. You will notice that the body of your Email is your DJ Contract form. You can setup your own contracts or other custom form templates to email on the "Setup Options Form".